Code Generation and Optimization
Last updated on 2024-11-22 | Edit this page
Estimated time: 60 minutes
Overview
Questions
- What are the three main modes of Codeium and how do they differ?
- How can developers effectively use the Command feature for code generation and refactoring?
- What role does context awareness play in improving Codeium’s suggestions?
- How does the Chat feature complement the Command and Autocomplete modes?
- What are the best practices for writing prompts that get optimal results from Codeium?
Objectives
- Learn how to use Codeium’s Command mode for code generation and refactoring
- Master the Chat feature for interactive coding assistance and problem-solving
- Understand how to leverage Autocomplete for efficient code writing
- Practice using context awareness to get more relevant code suggestions
- Develop skills in writing effective prompts for better AI assistance
Codeium accelerates software development through three key modes: Command, Chat, and Autocomplete. Each mode leverages Codeium’s real-time context awareness engine to deliver highly relevant and useful suggestions. After a brief section about the context awareness feature, we will explore how to use these modes to generate, optimize, and refactor code, as well as to identify and fix bugs.
Please note that while using Python is not required since Codeium supports multiple programming languages, all exercises and solutions will be provided in Python.
Code Optimization
Code optimization is the process of making your code faster (reducing runtime), more efficient (using fewer resources like memory and disk), and/or more readable (easier for developers to maintain). Some common strategies for code optimization include:
- Algorithmic optimization: Improving the efficiency of algorithms to reduce the time or space complexity. Example: Reducing time complexity from O(n²) to O(n log n) by choosing the right sorting algorithm.
-
Code refactoring: Eliminate redundancy, improve
readability, and enhance maintainability without changing the code’s
functionality. Example: Replace nested loops with more concise
operations like
map,filter, or comprehensions. - Memory optimization: Reducing memory usage by optimizing data structures, avoiding memory leaks, and minimizing unnecessary allocations. Example: Using generators instead of lists to avoid storing all elements in memory.
-
Parallelism and concurrency: Utilize parallel
processing or multithreading to split tasks. Example: Process
chunks of data simultaneously using
multiprocessingin Python.
Much more can be said about code optimization, but these are some common strategies to keep in mind as you work with Codeium.
Context Awareness
Context awareness is one of Codeium’s most powerful features, allowing it to offer personalized and highly relevant suggestions by pulling information from various sources. Traditionally, generating code required training large LLMs on specific codebases, which is resource-intensive and not scalable for individual users. However, Codeium uses a more efficient method known as retrieval-augmented generation (RAG). This applies across the board to Autocompete, Chat, and Command.
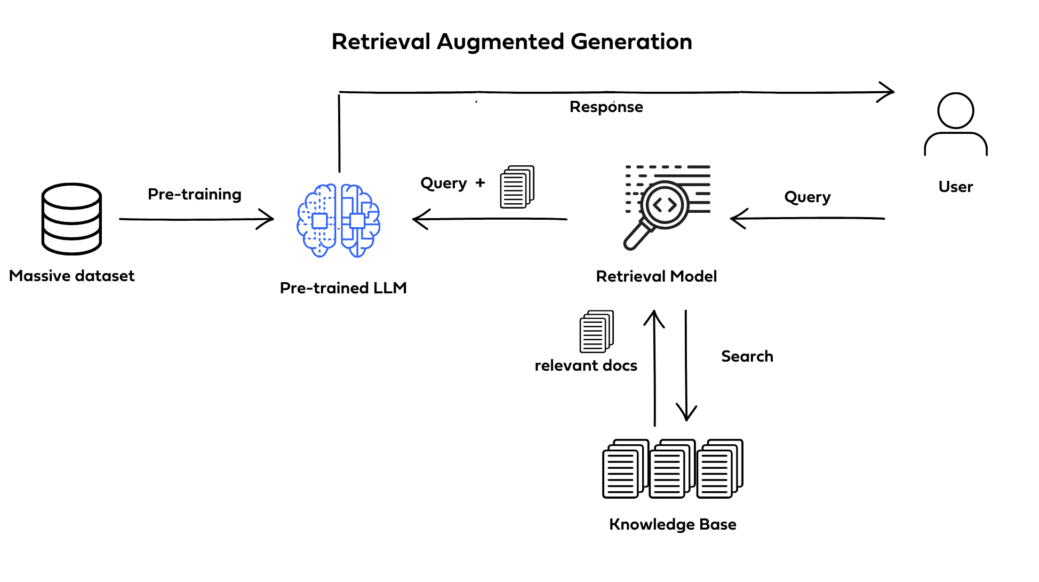
- Default Context: Codeium automatically pulls context from multiple sources, including the current file and other open files in your IDE, which are typically highly relevant to your ongoing work. Additionally, Codeium indexes your entire local codebase, retrieving relevant snippets even from closed files to assist as you write code, ask questions, or execute commands.
-
Context Pinning: Developers can provide specific
guidance by “pinning” custom context through the chat panel’s context
tab. You can pin directories, files, repositories, or specific code
elements (like functions or classes) for persistent reference across
Autocomplete, Chat, and Command. Context Pinning is useful when your
current work depends on code from other files; however, it’s best to pin
only essential items to avoid slowing performance. Here are some
effective uses of Context Pinning:
- Module Definitions: Pin class/struct definitions from other modules within your repository.
- Internal Frameworks/Libraries: Pin directories with framework/library usage examples.
- Specific Tasks: Pin files or folders with interfaces (e.g., .proto files, config templates).
- Current Focus Area: Pin a directory containing most of the files relevant to your coding session.
- Testing: Pin a file containing the class you’re writing unit tests for.
For instance, if you’re working on a function and ask Codeium to help refactor it, the tool will pull in relevant context from both your active file and other parts of your codebase to improve the output. This combination of multiple context sources ensures higher-quality code generation, fewer errors, and suggestions that feel tailored to your project.
Command
The Command feature of Codeium allows you to generate or modify code by using natural language inputs. Instead of manually coding everything, you can describe what you want in plain English, and Codeium will help you do it — whether it’s creating new functions or refactoring existing pieces of code.
By pressing
⌘(Command)+Ion Mac orCtrl+Ion Windows/Linux, you can enter a prompt and receive code suggestions, making it easier and faster to develop code directly within your editor.Codeium will then provide a multiline suggestion that you can accept or reject. You can accept a suggestion by pressing
⌥(Option)+Aon Mac orAlt+Aon Windows/Linux, reject (⌥+Ron mac orAlt+Ron Windows/Linux), or follow-up a generation (⌥+Fon Mac orAlt+Fon Windows/Linux) by using the appropriate shortcuts or by clicking the corresponding code lens above the generated diff.
If you highlight a section of code before invoking Command, then the AI will edit the selection spanned by the highlighted lines. Otherwise, it will generate code at your cursor’s location.
Refactoring, Docstrings, and More
In Codeium, code lenses appear right above your function and class definitions, providing convenient shortcuts for common tasks. These clickable labels allow you to quickly generate docstrings, explain code, or refactor code with just a click, saving time on manual edits. These features are powered by Command, which is invoked when the code lenses are clicked.
Refactor Functionality: Clicking the
Refactorlabel triggers Codeium’s refactoring capabilities, providing a dropdown of pre-filled options or allowing you to write a custom instruction. This is particularly useful for improving performance or restructuring code. You can also highlight a block of code and use Command (⌘+IorCtrl+I) to perform more targeted refactoring.Docstring Generation: For generating documentation, clicking the
Docstringlabel automatically creates a docstring above your function header (or under the function header in Python). This AI-generated documentation will describe what the function does, helping you maintain well-documented, readable code. In Python, for example, the docstring will be correctly placed directly beneath the function header.
Smart Paste
This feature lets you copy code and paste it into a file in your IDE
that’s written in a different programming language. Use
⌘+⌥+V (Mac) or Ctrl+Alt+V (Windows/Linux) to
activate Smart Paste. Codeium will automatically detect the language of
the destination file and translate the code in your clipboard
accordingly. With context awareness, Codeium will also adapt the pasted
code to integrate seamlessly, such as by referencing relevant variable
names.
Here are some potential use cases:
- Code migration: for instance, converting JavaScript to TypeScript or translating Java into Kotlin.
- Adapting code from online sources: you found a helpful utility function in Go, but your project is in Rust.
- Exploring a new language: if you’re curious about Haskell, you can see how your code might look if written in it.
Best Practices
Here are a few things to remember when using Command function of Codeium:
The model behind Command is more advanced than the one used for autocomplete, making it slower but more capable of following complex instructions.
To edit a specific selection of code, highlight that piece of code before using Command. If not, it will generate new code at the cursor’s position.
For effective use, try to give clear and detailed prompts. While simple requests like “Fix this” or “Refactor” can work well due to context awareness, more specific instructions like “Write a function that takes two inputs of type
Diffableand implements the Myers diff algorithm” can yield even better results.
Chat
The Codeium Chat feature offers a powerful way to interact with an AI assistant directly within your coding environment, providing instant, contextual feedback on the code. Unlike the Command function, Codeium Chat is designed for a more conversational and responsive interaction, making it easy to discuss complex coding questions and solutions. The base Chat model is available to all Codeium users and it is based on Meta’s Llama 3.1 70B.
In Visual Studio Code, you can access Codeium Chat by clicking on the Codeium icon located in the left sidebar by default.
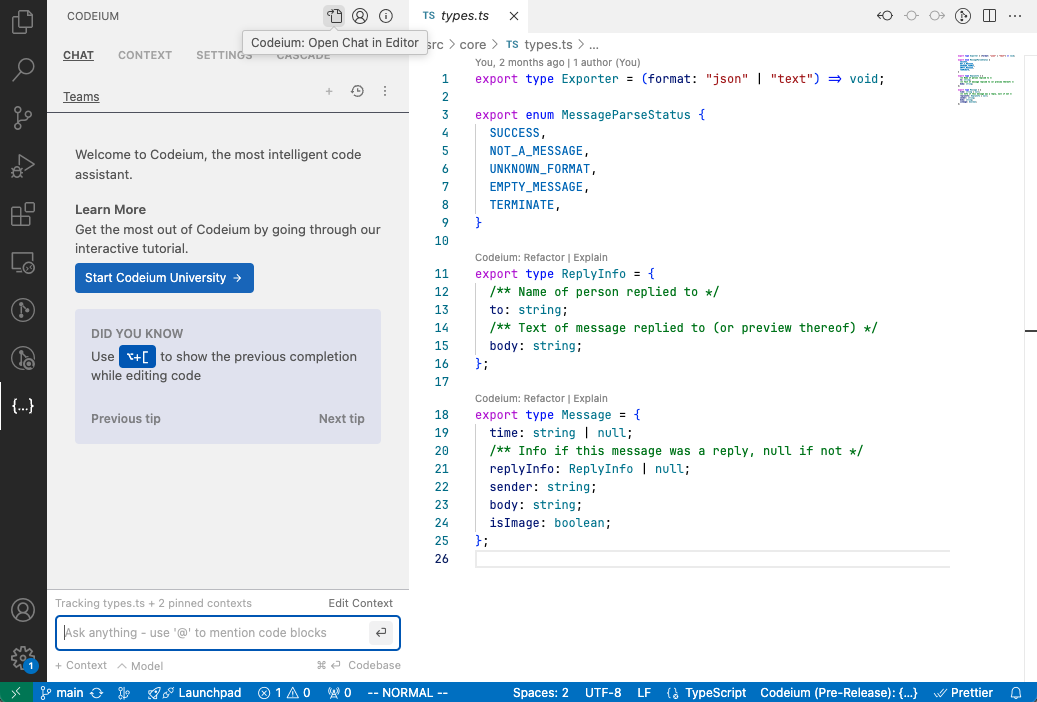
To quickly open the chat panel or toggle focus between it and your
code editor, use ⌘+⇧+A on Mac or Ctrl+⇧+A on
Windows/Linux. For a more flexible experience, you can pop the chat
panel out of the IDE entirely by clicking the “pop-out” icon at the top
of the chat window.
@-Mentions
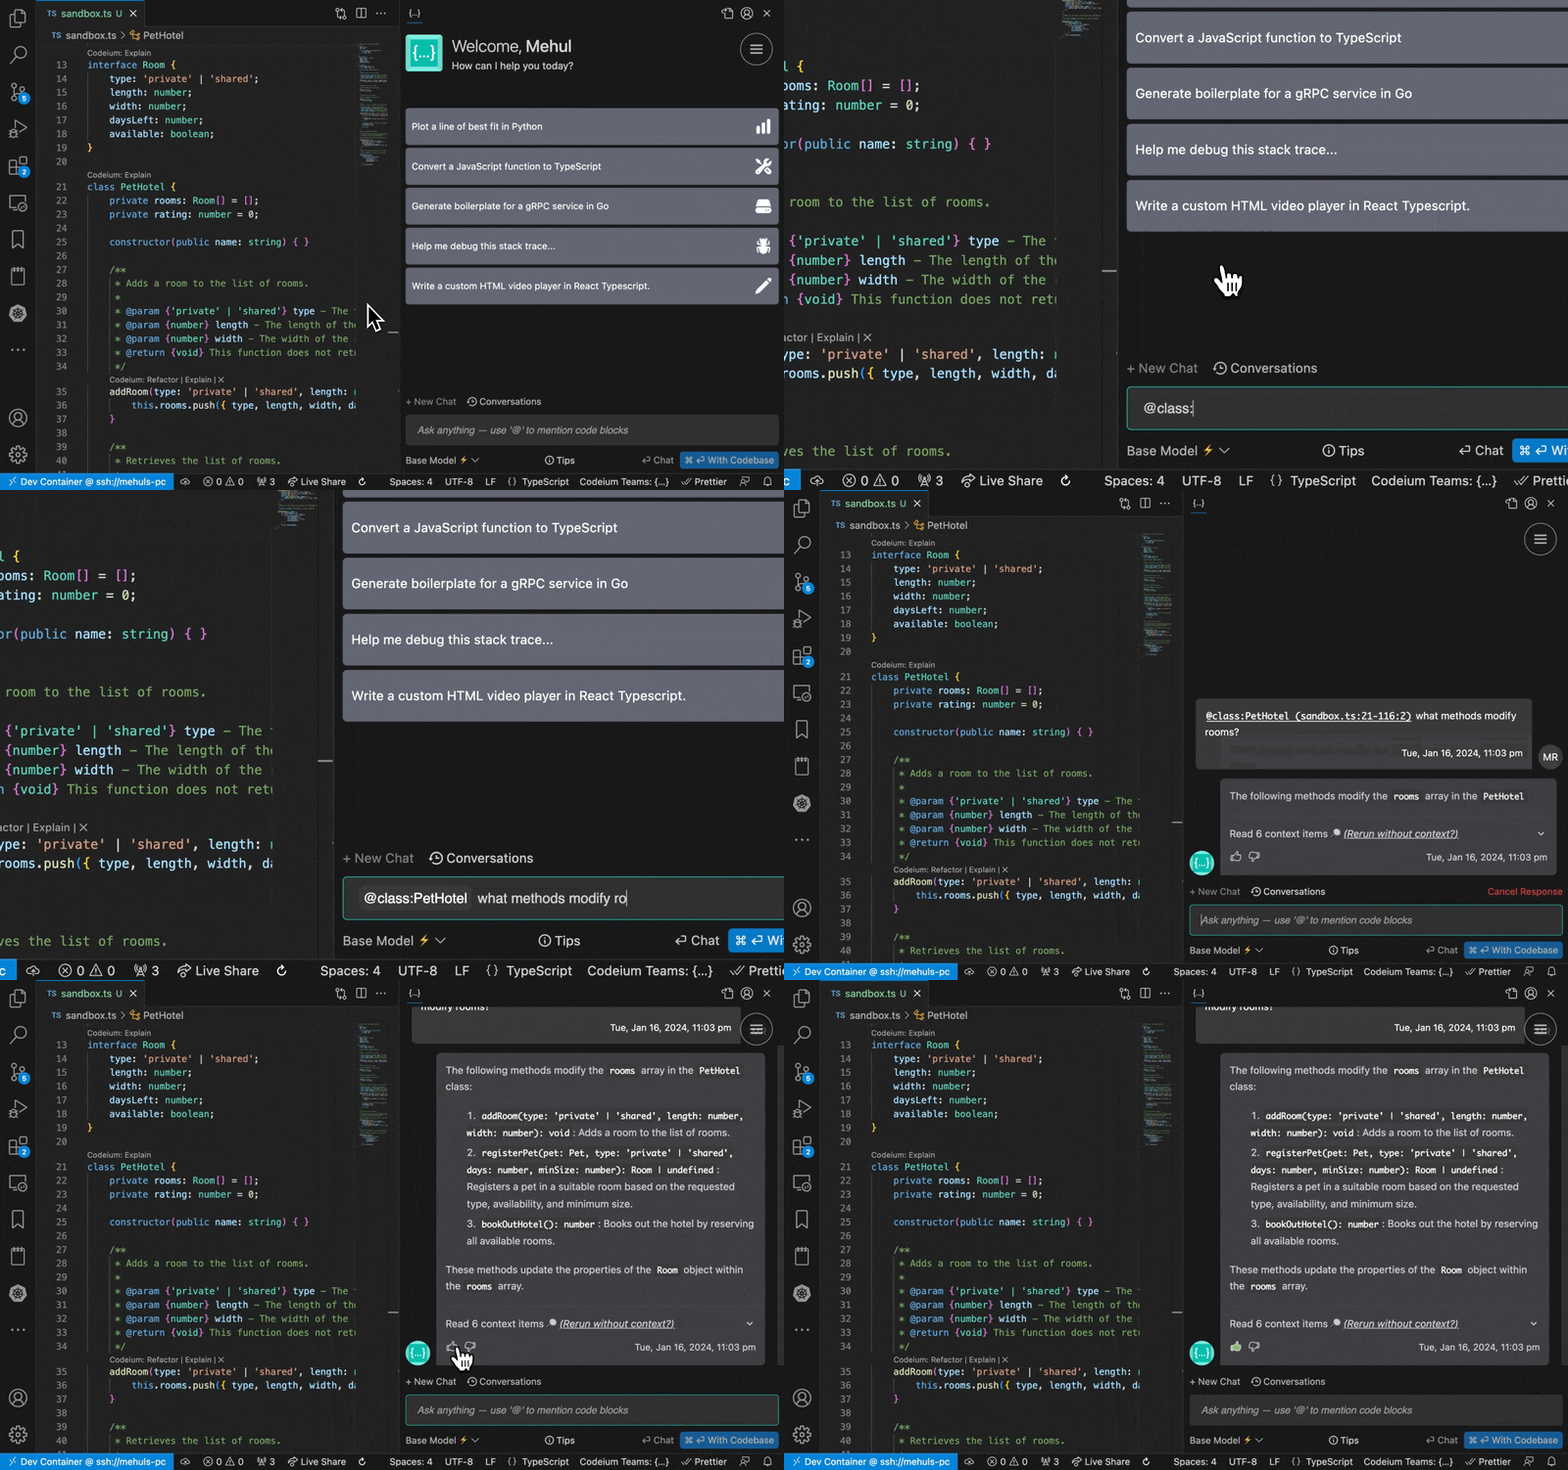
In any chat message, you can use the @-Mentions feature to refer to
context items from within the chat input by prefixing a word with
@. Context items can be function names, class names,
directories and files, or even content of your termnal history. By doing
this explicitly, Codeium will make the most relevant suggestions for
you.
For instance, you can mention classes, as shown below:
Prompting
Clear and efficient prompting is a vital element of both Chat and Command features. There are three key components to a good prompt:
Clear Objective: Be specific about what you want Chat to produce—whether it’s new code, a refactor, or an explanation.
Contextual Details: Use
@mentions to provide context, such as referring to specific functions, classes, or modules.Constraints: If there are specific requirements, such as using certain frameworks or considering performance, include these in your prompt.
Example:
Bad: Refactor rawDataTransform
Good: Refactor @func:rawDataTransform by turning the while loop into a for loop and using the same data structure output as @func:otherDataTransformer

Note that these best practices apply to both Chat and Command modes, as they help Codeium understand your needs more effectively.
💡 Prompting Best Practices
The prompting strategies we’re exploring here for Codeium aren’t just limited to this tool. These techniques (e.g., like being clear, concise, and specifying outputs) apply to many other AI-powered tools like ChatGPT, Copilot, and beyond. Mastering these skills will make your interactions with all AI tools more effective, no matter the platform!
Other Features
-
Persistent Context: Configure the
Contexttab in the chat panel to enable continuous contextual awareness during and across conversations. Within this tab, you’ll find:- Custom Chat Instructions: Brief prompts like “Respond in Kotlin and assume I have little familiarity with it,” which guide the model’s response style.
- Pinned Contexts: Key items from your codebase (such as files, directories, or code snippets) that you want the model to actively consider.
- Active Document: Highlights the currently active file, giving it priority.
- Local Indexes: Lists repositories that the Codeium context engine has locally indexed.
-
Slash Commands: Use the
/explaincommand at the beginning of a message to request an explanation from the model. Currently, this is the only supported slash command. - Copy and Insert: When a response includes code blocks, you can either copy the block to your clipboard or insert it directly into your editor by using the buttons above the code block.
- Inline Citations: The model can reference specific items from your code, often linking snippets directly in its responses.
-
Regenerate with Context: Codeium assesses whether a
question requires general or codebase-specific context by default. You
can ensure a response includes code context by pressing
⌘⏎, or for previously answered questions, by clicking the sparkle icon to rerun it with context. -
Chat History: Access past conversations by
selecting the history icon in the chat panel. You can start a new
conversation by clicking
+or export existing chats using the⋮menu.
Here are some typical use cases of the Chat functionality:
Writing Boilerplate Code: Easily generate function headers or repetitive code blocks by providing simple prompts like “Write a function that takes X and Y, performs A, B, C, and returns Z.”
Writing Unit Tests: You can use Chat to quickly write unit tests for your functions. For instance, ask it, “Write a unit test for @function-name that tests edge cases for X and Y.”
Generating Docstrings and Comments: Use Chat to add useful comments or docstrings to your code. Simply prompt it by saying, “Write a docstring for @function-name,” and it will generate a detailed explanation.
Explaining Code: For those new to a codebase or trying to understand complex logic, Chat can explain functions. You might ask, “Explain @function,” and Chat will provide a breakdown of the function’s purpose and workings.
Autocomplete
A key feature of Codeium is its Autocomplete function: with every keystroke, Codeium actively attempts to predict and complete what you’re typing. By analyzing the current file, previous edits, and contextual snippets from your codebase, it offers relevant suggestions as “ghost text”.
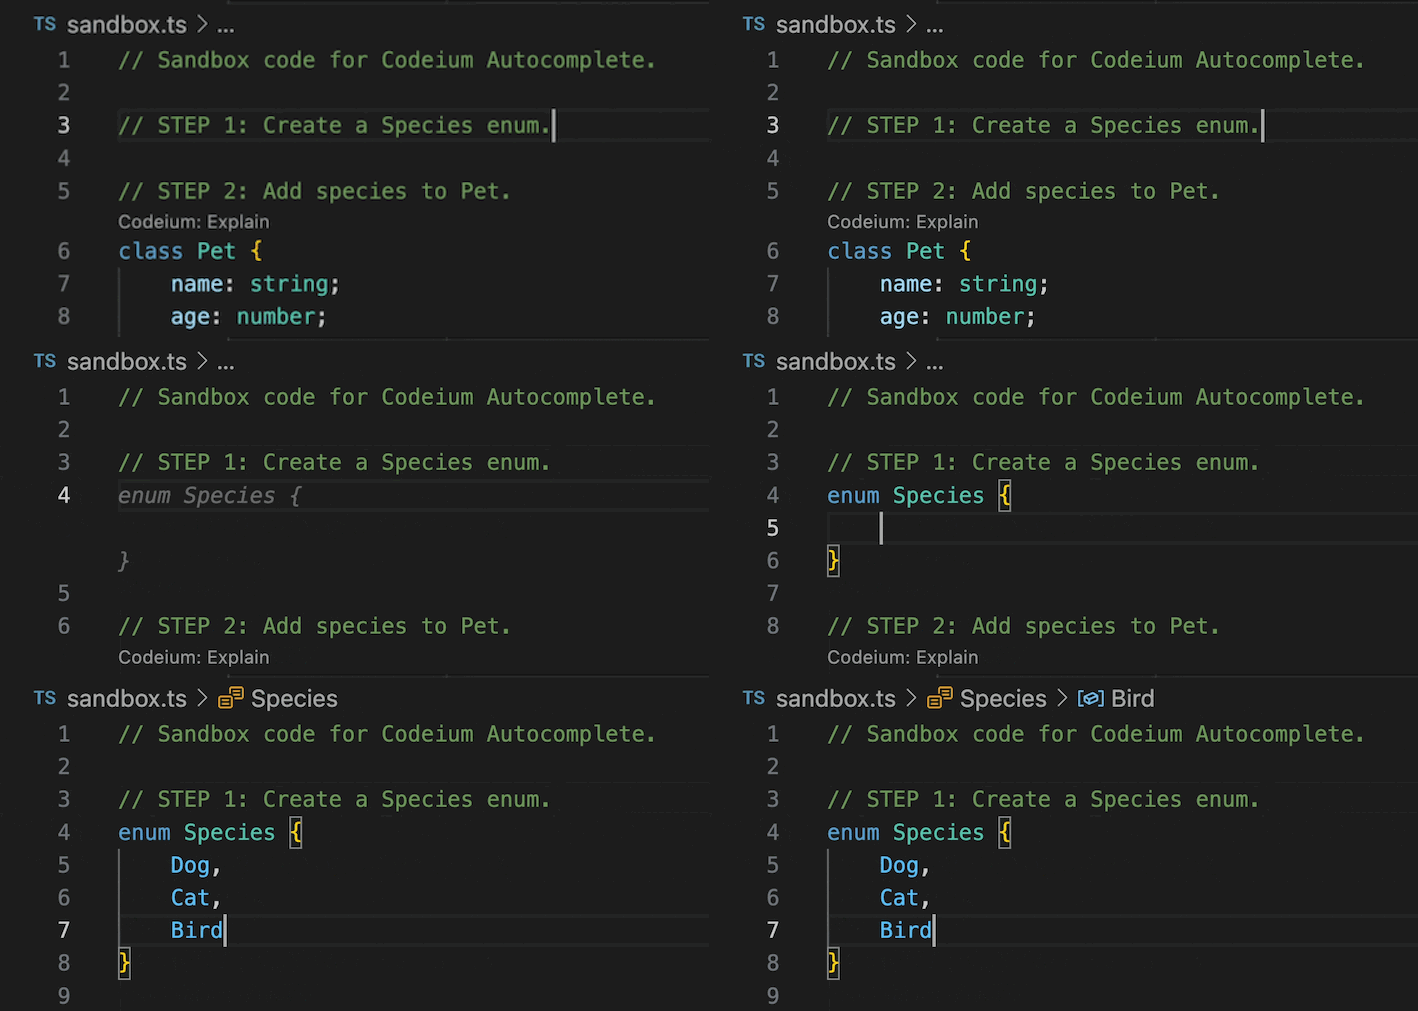
This feature can be particularly useful when you’re writing boilerplate code (which refers to repetitive code that often serves as a standard template), as it can save you time and reduce the likelihood of errors. By leveraging Codeium’s Autocomplete function, you can speed up your coding process and focus on the more creative and challenging aspects of your work.
Boilerplate, Formatting, and More
As already mentioned above, one of the most powerful ways to use Codeium is for automating repetitive coding tasks. Whether you’re writing boilerplate code, standard functions, or common design patterns, Codeium’s AI assistant can help speed up the process and reduce the manual effort required.
By recognizing patterns in your codebase, Codeium can predict and suggest repetitive structures such as:
- Boilerplate code: Generate routine code structures like class definitions, function signatures, or common initialization blocks with minimal effort.
- Repetitive functions: Quickly replicate commonly used functions or methods that follow a similar pattern, reducing the need for retyping or copy-pasting.
- Code formatting and styling: Maintain consistency in your code format by allowing Codeium to suggest and automate repetitive formatting tasks, saving you from manual corrections.
For example, when writing a set of functions that handle similar operations, Codeium can recognize the pattern after a few examples and suggest the next method based on prior code. This not only speeds up your workflow but also minimizes the risk of errors from copying or manually creating repetitive code.
Autocomplete Feature for Docstrings
Note that Codeium’s Autocomplete feature may also suggest docstrings as you type, further assisting in creating well-documented functions without needing to manually write them. This can be particularly useful when you need to create specific wordings and have the freedom to customize documents interactively.
Fill-in-the-middle (FIM)
Codeium’s Autocomplete model also includes Fill-in-the-Middle (FIM) capabilities. This is crucial because, more often than not, you’re inserting code within an existing file, rather than just appending new lines. With FIM, Autocomplete analyzes the code both above and below the current line to provide more accurate suggestions.
Let’s compare the FIM-enabled model to the standard model.
Codeium Autocomplete (with FIM):

Competitor Autocomplete (without FIM):

Note that the non-FIM model suggests a generic docstring based on only the preceding line with the function signature. In contrast, the FIM model provides a more contextually relevant suggestion based on the entire function definition.
Inline Comments
You can guide the Autocomplete feature by using comments within your code. Codeium interprets these comments and generates code suggestions to implement what the comment describes.
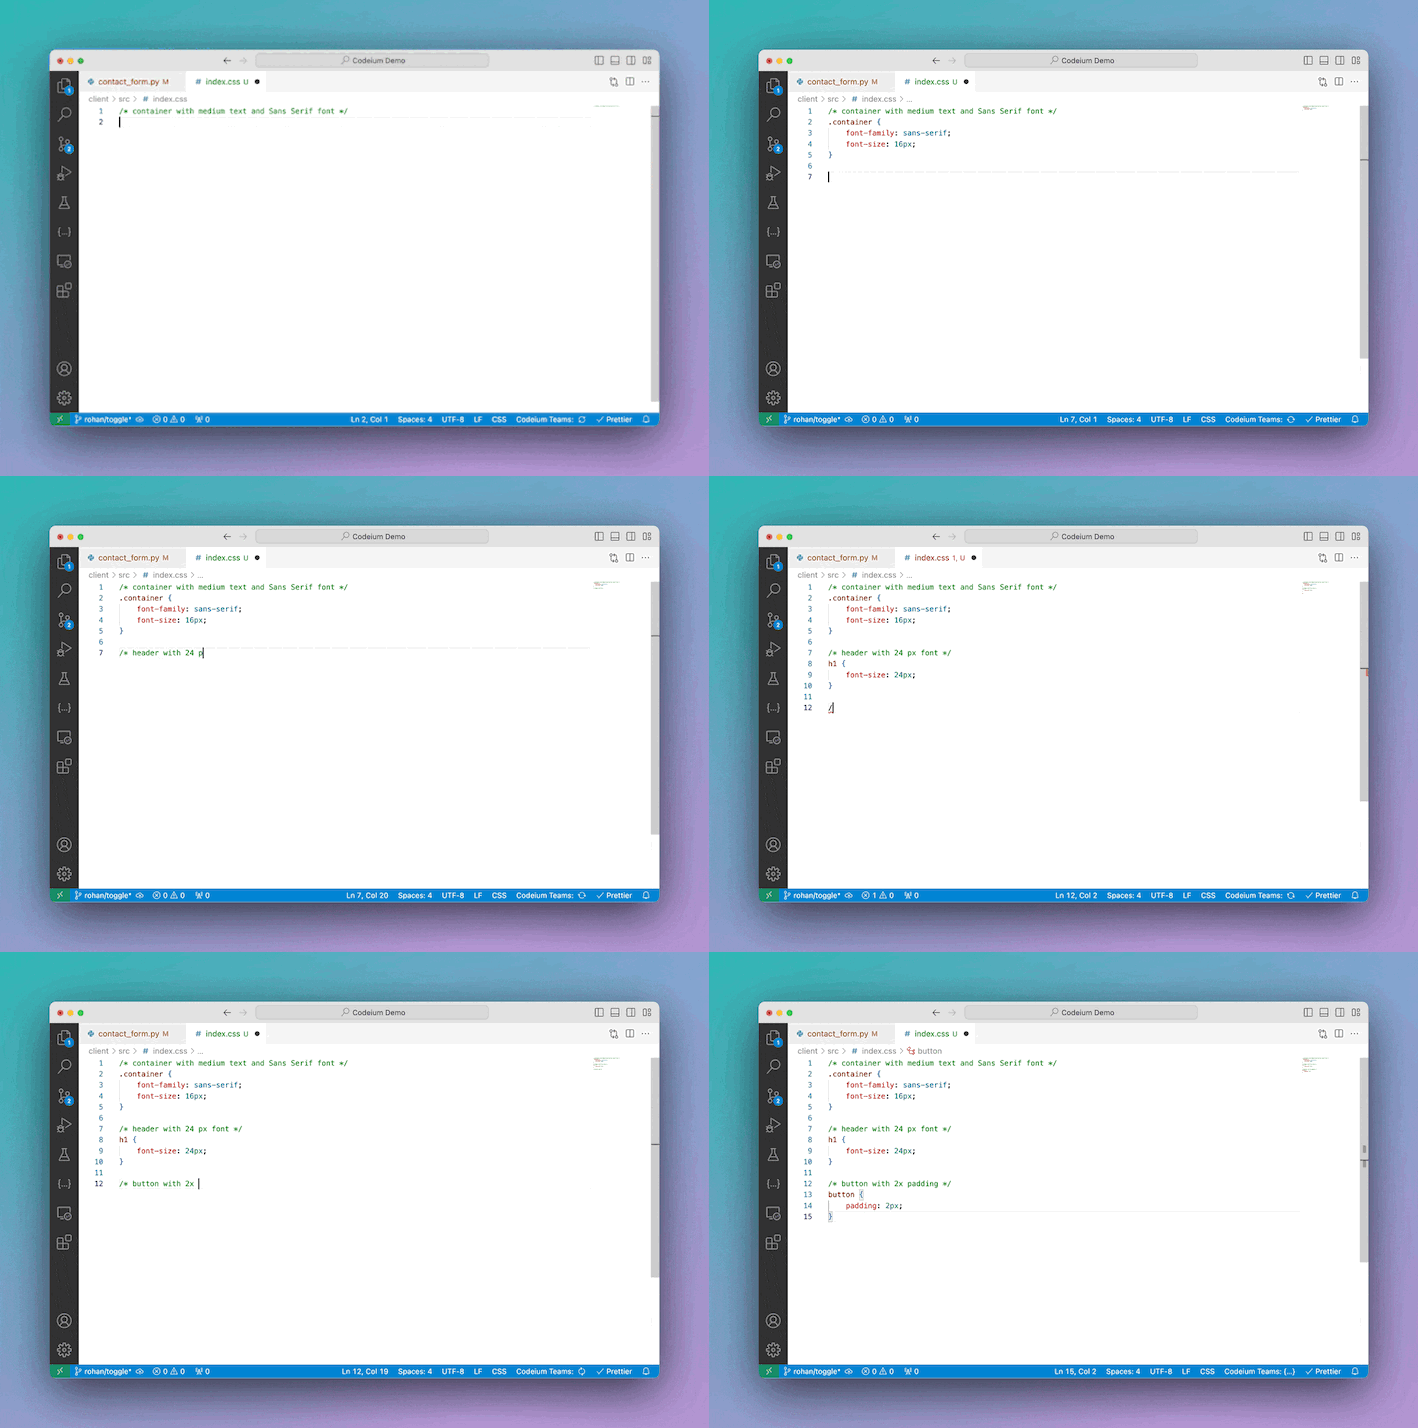
Shortcuts
The following shortcuts can be used to speed up your workflow:
-
Tab= accept suggestion -
Esc= clear suggestions
Best Practices
Avoid manually triggering Autocomplete; instead, let it naturally enhance your workflow. Writing prompts as comments is not recommended, but decorating your code with quality comments and information variable/function names yields the best results.
-
To achieve the best results with Autocomplete, it’s important to enhance your code with clear, declarative (not instructive) code, descriptive function names, and good comments with examples of the desired inputs and outputs. See the table below for examples:
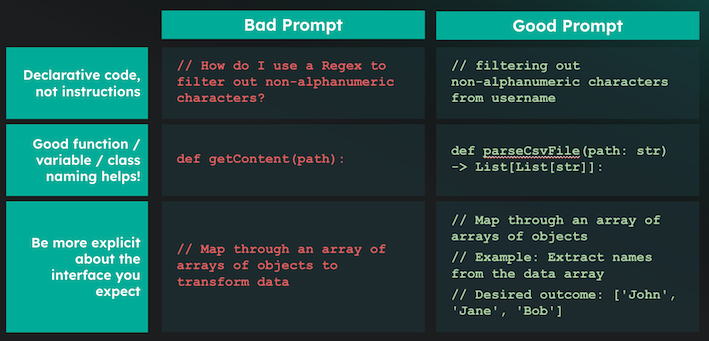
If needed, you can temporarily snooze Autocomplete. This feature is available in VS Code version 1.8.66. Simply click the Codeium button in the bottom right to access it.
Hands-on Practice
In the following exercises, you will have the opportunity to practice
using Codeium’s Command, Chat, and Autocomplete features to generate,
optimize, and refactor code. Create a python file (for example
exercise.py) in your IDE and follow along with the
exercises.
Jupyter Notebooks (Not Recommended)
It is also possible to use Codeium in Jupyter Notebooks, but for the best experience, it is recommended to use Jupyter Lab after installing the officially provided Codeium extension for JupyterLab.
Even if it is possible to use Codeium in Jupyter Notebooks directly within VS Code, the experience may not be as smooth as in a standard Python files. Indeed, Windows users may encounter issues with some of the Codeium shortcuts and features.
Code Generation
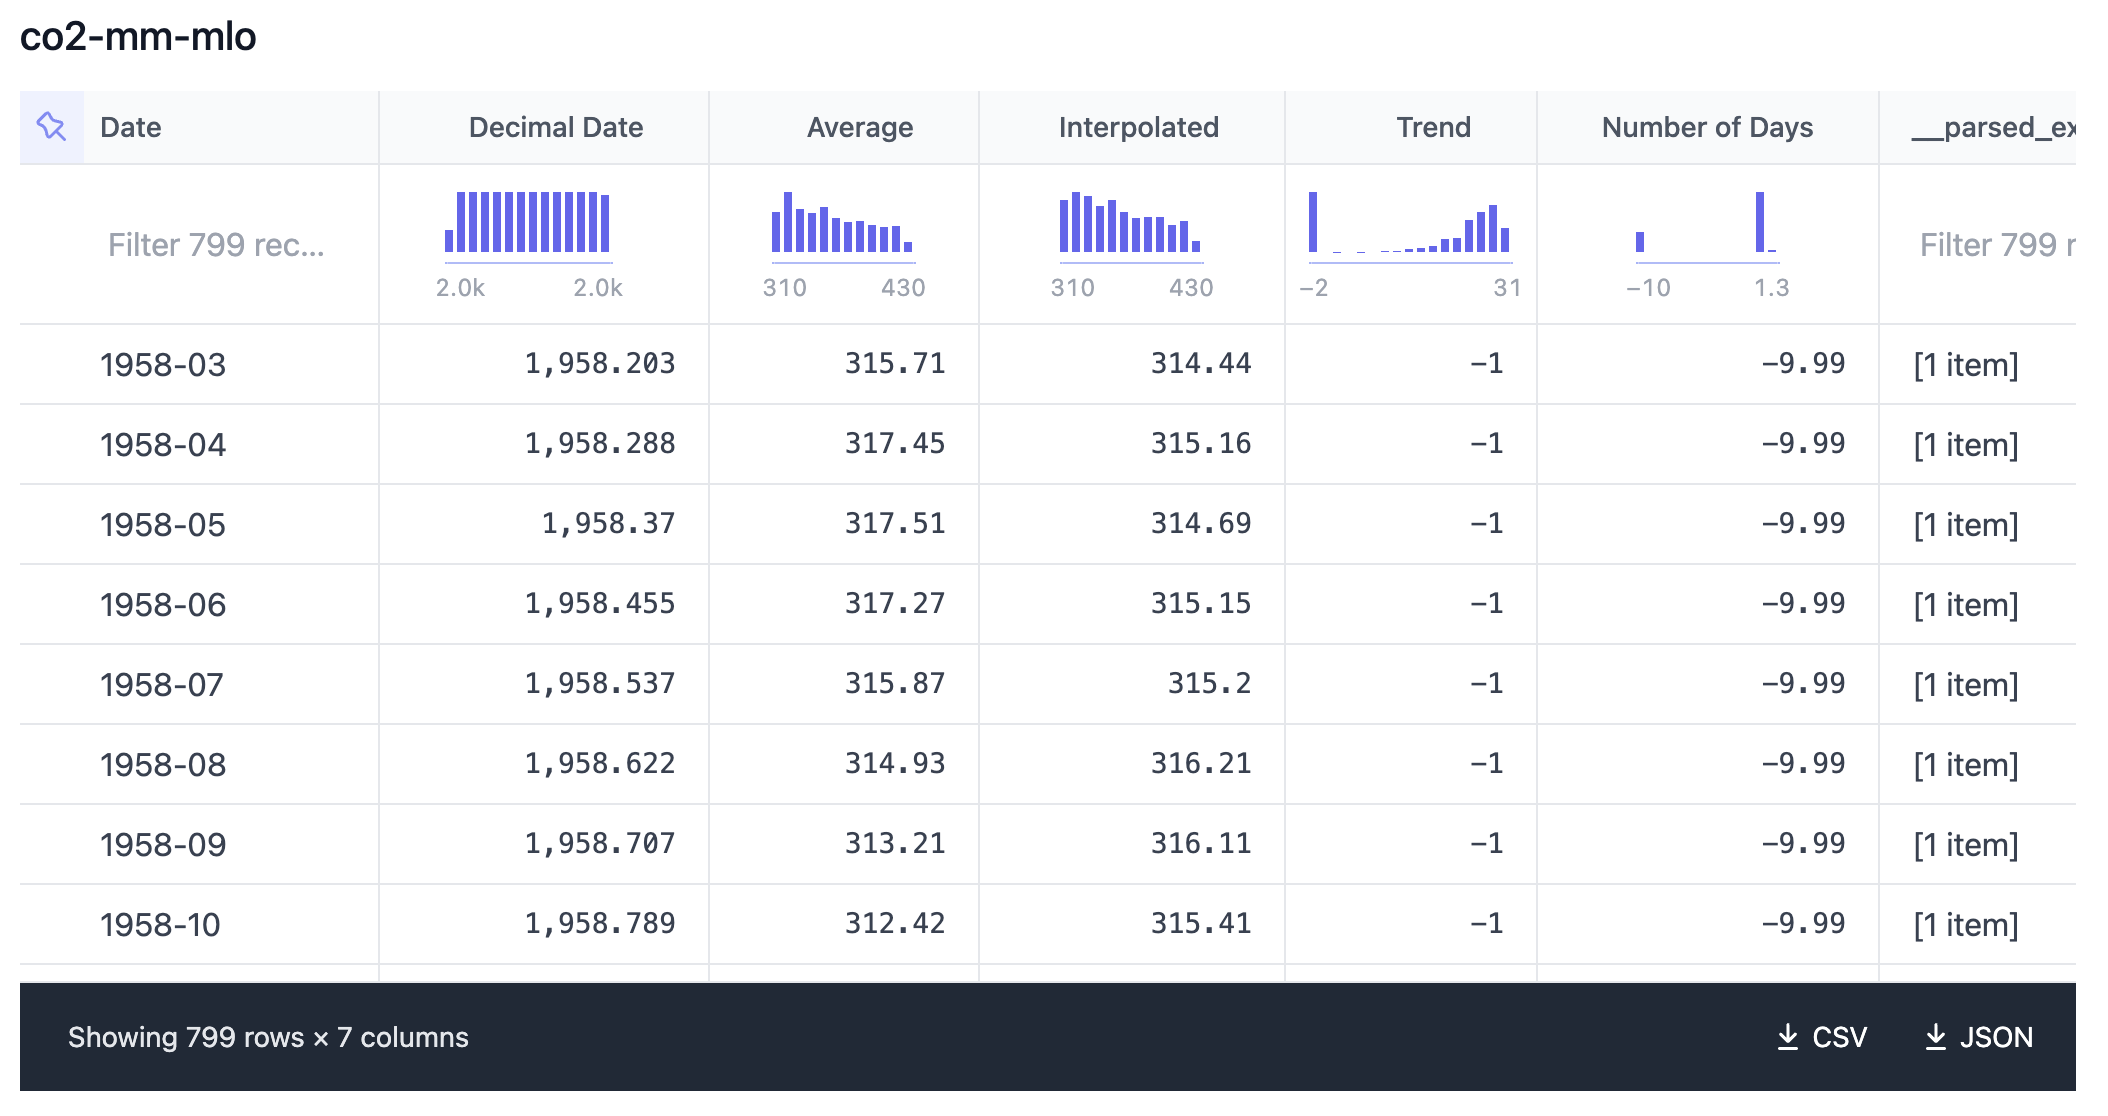
During the following exercises, we will be using a dataset containing
CO2 concentration measurements taken in Mauna Loa, Hawaii, from 1958 to
2024, grouped by month. The dataset is available in the file
co2-mm-mlo.csv on this website, and here is an
example data view of it:
-
Date: The date of the measuremen in the formatYYYY-MM. -
Decimal Date: The date in decimal format. -
Average: The average CO2 concentration in parts per million (ppm) per month. -
Interpolated: The interpolated CO2 concentration in ppm per month. -
Trend: The trend of CO2 concentration in ppm per month. -
Number of Days: The percentage number of daily averages used to compute the monthly average.
For more details about how the data was collected and processed, you can refer to the source.
Let’s start by exploring the Command mode and generating code
snippets to analyze a dataset. In Command mode, keeping the python file
open, press ⌘(Command)+I on Mac or Ctrl+I on
Windows/Linux to open the Command prompt. Then, copy and paste the
following text into your editor (you can also break it down in smaller
pieces if you prefer):
OUTPUT
Load a [CO2 concentration dataset](https://datahub.io/core/co2-ppm/) from the file `co2-mm-mlo.csv` into a Pandas DataFrame, then generate descriptive statistics and visualize data distributions. Read the dataset using the following URL: https://edu.nl/k6v7x.

1.  Write a function that takes a DataFrame as input and calculates key descriptive statistics, including:

   - Number of rows and columns
   - Data types of each column
   - Summary statistics (e.g., mean, minimum, maximum)

   Compute the statistics only for the numeric columns.

2. Write a function that accepts a DataFrame and a specific column as inputs, and creates a new figure in which it plots its distribution. If the column is numeric (e.g., `int64`, `float64`), create a histogram to display its distribution; if categorical, create a bar plot to show category frequencies. Add the name of the column to the title.

3. Write a function that creates a new figure in which it plots the `Average` and `Interpolated` columns on a single graph, with `Date` on the x-axis, to visualize their distributions over time.

4. In the main, print nicely the information computed in 1., run the function defined in 2. on all columns, and run the function defined in 3. Use the `show()` functionality to display the figures only at the end of the main.
Here is what you would expect to see in the generated code:
PYTHON
import matplotlib.pyplot as plt
import pandas as pd


def get_descriptive_stats(df):
    """
    Calculate key descriptive statistics for a given DataFrame.
    """
    stats = {"nrow": df.shape[0], "ncol": df.shape[1]}
    for col in df.select_dtypes(include="number").columns:
        stats[col] = {
            "dtype": df[col].dtype,
            "mean": df[col].mean(),
            "min": df[col].min(),
            "max": df[col].max(),
        }
    return stats


def plot_distribution(df, column):
    """
    Plot the distribution of a given column in a DataFrame.
    """
    fig, ax = plt.subplots()
    if df[column].dtype.kind in "bifc":
        df[column].plot.hist(ax=ax, bins=50)
    else:
        df[column].value_counts().plot.bar(ax=ax)
    ax.set_title(column)


def plot_time_series(df):
    """
    Plot the Average and Interpolated columns over time.
    """
    fig, ax = plt.subplots()
    df.plot(x="Date", y=["Average", "Interpolated"], ax=ax)


def main():
    url = "https://edu.nl/k6v7x"
    df = pd.read_csv(url)
    stats = get_descriptive_stats(df)
    print(pd.DataFrame(stats).T)
    for col in df.columns:
        plot_distribution(df, col)
    plot_time_series(df)
    plt.show()


if __name__ == "__main__":
    main()
There is something wrong here, can you spot it? We will address this issue later in the “Bug Fixing” exercise, so keep it in mind as you proceed.
Pseudo-randomness 🔍
You may obtain slightly different results due to the pseudo-randomness of the command mode generation process.
Instructions 🔍
The instructions provided in the text were clear and precise, designed to achieve the expected results accurately using the command mode. Try experimenting with removing, rearranging, or adding details to the instructions. You’ll notice that the assistant might generate slightly different code, which occasionally may not fully meet your intended goal.
This exercise highlights the importance of having a clear understanding of what you want to achieve when seeking help from an assistant. It allows you to refine or adjust the instructions to guide the tool effectively toward your objective. Relying too heavily on the assistant can lead to mistakes, a point we will emphasize repeatedly throughout this lesson.
Docstrings Generation
Now, let’s modify the get_descriptive_stats() and
plot_column_distribution() functions’ docstrings you
created during the previous exercise to add further details using
Codeium’s Refactor lens. Each docstring should:
- Describe the purpose of the function
- Document the function’s arguments and expected data types
- Explain what the function returns (if applicable)
- Optionally, provide a usage example
To do this, click on the Refactor lens above the
function definition and select the
Add docstring and comments to the code option. Codeium will
add more details to the existing docstring, making it more informative
and useful.
Note that if you don’t have a docstring yet in your function
definition, another lens will appear to help you generate one, the
Generate Docstring lens. Try experimenting with both lenses
to see how they can improve your code documentation.
💡 Tip
Try experimenting with different docstring styles! For example, you
could also explore the Google-style
docstrings using the Refactor lens or the Command mode.
The default style used by the lenses should be the NumPy-style.
🔍 Note
While Command mode is not aware of the context of your code and doesn’t maintain a preselected docstring style across different functions, Chat mode can detect and persist a chosen docstring style across multiple functions. This feature is particularly useful when you want to maintain a consistent docstring format throughout your codebase.
Here’s an example of how the get_descriptive_stats() and
the plot_column_distribution()functions might look with the
refactored docstrings:
PYTHON
def plot_distribution(df, column):
    """
    Plot the distribution of a given column in a DataFrame.

    For numerical columns, a histogram is plotted. For categorical columns,
    a bar plot of the counts is plotted.

    Parameters
    ----------
    df : DataFrame
        The DataFrame to plot the distribution for.
    column : str
        The column to plot the distribution for.

    Returns
    -------
    None
    """
    fig, ax = plt.subplots()
    if df[column].dtype.kind in "bifc":
        # Plot a histogram for numerical columns
        df[column].plot.hist(ax=ax, bins=50)
    else:
        # Plot a bar plot of the counts for categorical columns
        df[column].value_counts().plot.bar(ax=ax)
    ax.set_title(column)

def plot_column_distribution(df, column):
    """
    Plot the distribution of a given column in a DataFrame.

    Parameters
    ----------
    df : DataFrame
        The DataFrame containing the data.
    column : str
        The column name in the DataFrame for which to plot the distribution.
    """
    # Create a new figure and axis for the plot
    fig, ax = plt.subplots()

    # Check if the column is of a numeric type
    if df[column].dtype.kind in "bifc":
        # Plot a histogram for numeric data
        df[column].plot.hist(ax=ax, bins=50)
    else:
        # Plot a bar chart for categorical data
        df[column].value_counts().plot.bar(ax=ax)

    # Set the title of the plot to the column name
    ax.set_title(column)
Note that you might need to adjust the generated docstring if the function has complex logic or if the generated docstring lacks specific details about edge cases or exceptions.
Bug Fixing (5 min)
Look back at the code generated during the “Code Generation” section. If you look at the head of the DataFrame, what do you notice? Use the Chat feature to discuss the issue with Codeium and ask for suggestions on how to resolve it. Then run again the functions defined in the previous exercise to see if the issue has been resolved.
The issue is that the Date column is used as index
column, causing all the other columns to shift by one. Here’s how you
might discuss the issue with Codeium in the Chat:
-
Prompt: “The
Datecolumn is being used as the index, causing the other columns to shift by one. How can I read the file without encourring into this issue?” -
Discussion: Codeium might suggest resetting the
index or using the
reset_index()function to address the issue. Alternatively, it might recommend settingindex_col=Falsewhen reading the CSV file to prevent theDatecolumn from being used as the index.
Correct example of how to resolve the issue:
- Verifiy the suggestion by running the functions again and checking the output.
Code Optimization
Given the following piece of code that processes the previously read the dataset to find the difference between the average and interpolated CO2 concentration for each row:
PYTHON
avg_int = []
for i in range(df.shape[0]):
    avg_int.append(df.iloc[i]['Average'] - df.iloc[i]['Interpolated'])

df['Avg-Int'] = avg_int
We can use the Command (or Chat) feature to optimize it for better performance and readability. Here’s an example of how the optimized code might look:
PYTHON
df['Avg-Int_opt'] = df.apply(lambda x: x['Average'] - x['Interpolated'], axis=1)
assert df['Avg-Int'].equals(df['Avg-Int_opt'])
Or even like this:
This version is faster and more memory-efficient because it uses
vectorized operations, which are a key feature of the
pandas library.
Code Optimization (5 min)
Similar to the exercise above, execute the code as is to verify it works and examine the output. Then use Codeium’s Chat feature to analyze and suggest potential improvements. Look for ways to enhance performance, readability, and conciseness.
PYTHON
# Convert 'Date' column to datetime format
df['Date'] = pd.to_datetime(df['Date'], format='%Y-%m')

# Filter data for a specific date range
filtered_df = df[(df['Date'] >= '2000-01-01') & (df['Date'] <= '2010-12-31')]

# Extract the year value from the 'Date' column
filtered_df['Year'] = filtered_df['Date'].dt.year

# Group data by year and calculate the average CO2 level for each year
avg_co2_per_year = filtered_df.groupby('Year')['Interpolated'].mean()

# Plot the results
plt.figure(figsize=(10, 6))
plt.plot(avg_co2_per_year.index, avg_co2_per_year, label='Average CO2 (ppm)', marker='o')
plt.xlabel('Year')
plt.ylabel('CO2 (ppm)')
plt.title('Average CO2 Levels by Year (2000-2010)')
plt.legend()
plt.grid(True)
plt.tight_layout()
plt.show()PYTHON
# Convert 'Date' column to datetime format and filter data for a specific date range
filtered_df = df[
    (pd.to_datetime(df['Date'], format='%Y-%m') >= '2000-01-01') &
    (pd.to_datetime(df['Date'], format='%Y-%m') <= '2010-12-31')]


# Group data by year and calculate the average CO2 level for each year
avg_co2_per_year = filtered_df.groupby(pd.to_datetime(filtered_df['Date'], format='%Y-%m').dt.year)['Interpolated'].mean()


# Plot the results
avg_co2_per_year.plot(figsize=(10, 6), marker='o')
plt.xlabel('Year')
plt.ylabel('CO2 (ppm)')
plt.title('Average CO2 Levels by Year (2000-2010)')
plt.grid(True)
plt.tight_layout()
plt.show()
Comparison:
- Combined the
pd.to_datetimeconversion and filtering steps into one. - Removed the unnecessary
filtered_df['Year']column and used thedt.yearaccessor to extract the year from the'Date'column. - Simplified the plotting code by using the
plotmethod of the Series object and removing the unnecessaryplt.figurecall. - Removed the
labelparameter from theplotfunction, as it is not necessary when using theplotmethod of the Series object.
Key Points
- Codeium offers three main modes: Command, Chat, and Autocomplete, each serving different coding needs
- Context awareness through RAG technology helps Codeium provide more relevant and accurate suggestions
- The Chat feature enables conversational interaction with code-aware AI assistance
- Autocomplete includes Fill-in-the-Middle capabilities for more accurate code completion
- Clear, declarative comments and good naming conventions improve Codeium’s effectiveness
